3D and Animated Design ARCH11248 (DRAFT)

NB This page is currently being revised for 2015-16 session
Semester 1, 20 credits. Course organisers: Richard Coyne and Jules Rawlinson [updated RDC 18/9/2012]
Tuesday 14:10 – 16:00,
Calendar tinyurl.com/ARCH11173
Synopsis
This course introduces the techniques that are used in digital design: three dimensional modelling, simple computer animation, image rendering, and the preparation of material suitable for publishing on the World Wide Web. The emphasis is on design. Students advance through a series of lectures, demonstrations, practical project work, exercises and critique in a group context.
Learning Outcomes
Ability to:
- use applications for modelling, image manipulation, and basic animation
- work in a collaborative context of group review and critique
- engage in a creative task within tightly constrained bounds and to present the outcome to conform to precise specifications
- interpret and apply a set of requirements pertaining to a design task.
Lecture Topics
1. Introduction to Digital Modelling
2. Economy and Detail
3. Polygon Modelling
4. Rendering and Radiosity
5. Guest
6. Introduction to Animation
7. Advancing with Animation
8. Visual Narrative
9. Just Gaming
10. 3D in other Media
11. Interactive 3D Environments
Assessment
Two assessed submissions, each worth 50%. Component 1: Three-dimensional computer model. Component 2: Rendered three-dimensional models with complex animation. Note that there will be subcomponents to these submissions. Each main component should be accompanied by an explanatory text of guide length 750 words (PDF format).
Criteria for assessment
Work will be assessed on the basis of
- Demonstrated competence with modelling and image manipulation tools
- Skills in creatively deploying allocated resources of varying quality and with diverse attributes
- Precision and competence in presentation
- Ability to meet the requirements of the project brief and deal creatively with its open-ended aspects
- Design quality of the work in terms of meeting functional requirements, legibility, clarity, and appropriate use of media
Account will be taken of the risks taken and degree to which the design work deviates from standard solutions
Please note that assessment will take account of tradeoffs between the above criteria, particularly taking account of the diverse backgrounds of students in the class. You are encouraged to seek feedback during the development of your work, but please note that adhering to feedback does not guarantee a high assessment of the completed work. Note also that the assessment of the work is not necessarily commensurate with the amount of time spent on the project work. The issues of design and its evaluation will be further canvassed in Media and Culture.
Teaching Method
Work in this course is project-based. So the project and its tasks provide the focus, with skills being taught in targeted lecture/seminars as needed to progress the work. In general there will be one scheduled lecture followed by a practical session per week to discuss the work, but tutors will be available outside these times as well. You will be expected to work in proximity to other students in the class and benefit from each other’s developing expertise. The main software system used (Blender) has highly advanced modelling and animation capabilities, beyond that needed for the project work. The software will be introduced at a basic level through lectures and tutorials. We will make use of online teaching resources, and students are encouraged to use these to proceed to advanced level as private study. Blender is released under a GNU Public License as Free Software. There will be opportunities to develop further skills in any of the software in other courses, and into the Final Project during the summer.
Principal Software
- 3d Modelling and animation: Blender
- also available: Sketchup, Maya, Form•Z
- image processing: Adobe PhotoShop
- video processing: Final Cut (Pro and Express)
Project Brief: Biotech Media Engine
The year is 2052. As predicted, electricity and radio waves have taken second place to a revival of light, wind, water vapour, kinetic energy and biomechanical processes as safe, inexpensive energy sources and communications media.
Designers, inventors and developers are now re-purposing and customizing their products in response to the scarcity of resources, the build up of decades of obsolete high tech equipment, and society’s reaction against the uniformity of mass production.
Phostic Ltd have commissioned you to adapt an item of high tech scrap as a device for projecting 2D pictures, videos and sounds onto any suitable screen-like surface. You have been given an item of scrappage carefully selected and ready for repurposing as a desktop media projector.
Move 1: Screen apparatus
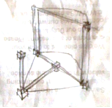
Your first task is to design and build (as a computer model in Blender) a general-purpose screen suitable for receiving images from any such projector. Design the screen as a flat or slightly curved surface, with a supporting frame, able to display a rectangular image 40.96 cm x 30.72. The whole apparatus is to be lightweight and portable, made from cylindrical straight sections of tubing joined by connectors, and able to stand on a table. You can copy or adapt your design from the sketch found in the archives of Phostic’s founding inventor Dr Phos:
Complete in JPG format:
- 1 digital image of your screen apparatus at 1280 x 720px.
- 1 thumbnail of the same image cropped at 64 x 64 px. White background.
Download some previously submitted Crit Submission examples (with a slightly different brief)
Move 2: Projector
Submission date: TBC
Design and model your projector. It will have the basic form of your item of scrappage, but with an activate-deactivate mechanism and a source for the projector beam. As your device likely operates with kinetic energy flows, fluids, and luminous organic energy sources then its activation-deactivation will involve the movement of levers, ratchets, springs, valves or other conspicuous parts. In fact the year 2052 sees a decline in the modernist desire for seamless and invisible devices and processes: “If it gleams it’s got seams”, as the adage goes. Consumers of the future enjoy the patina that comes with age, the irregular dulling of once shiny precision engineering. Such tributes to social responsibility and respect for the environment have become status symbols. Your projector should resemble or include your scrap item, but it is up to you how much detail you include through simplification and abstraction. All projectors require at least one twentieth century electronic radio valve to be included in the device. A small number of valves are available from course tutors on short loan for modelling. Remember time and resource constraints, and the more surfaces you model the slower it will be to render.
Position the projector in front of your screen. Point the camera that generates the image away from the screen so that we can’t see its active surface. Generate an image of the ensemble with your device in its deactivated mode. Deactivated means it’s not projecting anything, and you should try to frame your image in such a way that allows us to see the ‘context’ of the projector in relation to the projection surface.
You are required to submit 2 images of the screen and 2 images of the projector, and the images should be 1280px by 720px in PNG or JPG formats. At least one of the images for each device should show the entire device, you may then like to use the second image to focus on a particular area of detail that might be difficult to see, or frame the device from a second angle. You should CLEARLY mark which image is the “main” view for each device. It is useful (but not required) to submit the Blender (.blend) project along with the images, partly because sometimes markers like to navigate round your models in Blender to give you additional advice, and partly because the file gets backed up for you!
You are also required to submit a short report of guide length 750 words (PDF ONLY) outlining the project goals and inspirations, and any problems, solutions or interesting points encountered along the way. You might also use this report to clarify or explain the projector use, and include links to any third party materials that may have been used.
The report should also contain a brief appraisal/critique of the project, with suggestions as to how, with hindsight, the project may have been improved and how it could be developed in the future.
Subject matter for this appraisal might include references to design theory, for example pointing to examples of emphasis, contrast, repetition (and progression), texture, colour, mass, balance (symmetry), harmony (unity, variety, consonance, dissonance), proportion and scale. You could include screenshots or images as part of this report. You don’t need to address all these factors, but they are worth considering in your work.
All the files to be submitted (JPG or PNG, plus PDF) should be compressed into a single ZIP file for submission. On the Alison House lab machines this can be accomplished by placing all the required files into a single folder, then selecting the folder in the Finder and choosing ‘Compress “YOURFOLDERNAME”‘ from the File Menu (or right-clicking the folder)
- Upload files as single ZIP to subsys.ace.ed.ac.uk/subsys
Move 3: Animation
Submission date: TBC
Position the projector in front of your screen. Point the camera that generates the image away from the screen so that we can’t see its active surface. Generate an image of the ensemble with your device in its deactivated mode. This is your image A.
You will be allocated a class member to forward your image A to and you will receive an image in turn from someone else (your image B).
Map the image you have been given (image B) onto the projection screen. Create an animation progressing from your image A to a final frame where we are looking at the screen and see image B full on. In the process show the projector activating. (Don’t show any humans in this. The projector should activate itself.) You can also choose to animate your screen. Submit in Quicktime MOV or MP4 format (Not AVI or anything else), H.264 codec, 1280 x 720px: a 30 second animation of the projector and screen activating. All animated movements should derive from the logic and mechanics of the devices, i.e. you would not expect to see components flying through the air unless they have a means of propulsion. The animation should be exactly 30 seconds long. It is important for you to be able to ‘edit’ your work into it’s most engaging and comprehensive form. Bear in mind the average TV advert is 30s long when it is first shown, then edited down to an even shorter spot. Do not include any titles on your animation.
You are also required to submit a short report of guide length 750 words (PDF ONLY) outlining the project goals and inspirations, and any problems, solutions or interesting points encountered along the way. Your report should include links to any third party materials that may have been used. The report should also contain a brief appraisal/critique of the project, with suggestions as to how, with hindsight, the project may have been improved and how it could be developed in the future. Subject matter for this appraisal might include references to the role of cinematography and editing in your work, alongside other design matters.
The files to be submitted (MOV or MP4 plus PDF) should be compressed into a single ZIP file for submission. On the Alison House lab machines this can be accomplished by placing all the required files into a single folder, then selecting the folder in the Finder and choosing ‘Compress “YOURFOLDERNAME”‘ from the File Menu (or right-clicking the folder)
- Upload files as single ZIP to subsys.ace.ed.ac.uk/subsys
You should also provide your animation to your Sound Designer. While logged in to EASE, upload your animation to this location on Infrared: infrared.ace.ed.ac.uk/easetest/resourceManager.cfm?browse=true&departmentId=3381 (You can also navigate to this location by selecting 2012-13 Digital Resources > Digital Modelling And Animation in Design > Final Animations MOS). Select “Upload a Resource” from the menu on the right, then select “Upload a file” from the Upload Options, then “Moving Image” as the resource type. Finally, browse for the file, complete the other fields and hit the “Upload” button.
NB For all online uploads, please allow the upload process to finish before quitting the browser.
The animations from the whole design team will be combined in the appropriate sequence to produce a longer animation.
Resources
Use the following key words to access images, sounds and ideas from Infrar.ed, Google, Wikipedia, Youtube, Vimeo, Second Life, public image repositories, and social media: phosphorescence, LED, valve, fibre optics, cybernetic serendipity, London Science Museum, Myst (computer game), Enigma Machine, Heath Robinson, Difference Engine, Turing Machine, repurpose, peak oil, old high tech, high tech retro, Tardis interior, Millennium Falcon, Archigram, Bladerunner. Post useful links on the WIP messageboard, Intellectual Property law is even stricter in 2052, and though you may look to external sources for inspiration you may not incorporate image and sound files other than those provided through Infrar.ed. Sources must always be acknowledged in reports, meta tags in databases, or even on the artefacts themselves if possible.