More commandline help
This post contains some useful information. While I’m not interested in encouraging you to hack DVDs and make production companies suffer, we do need to find ways to extract parts of films pull their audio and perform analysis on them. Some of the information below should help. It’s been tested for OSX users, but because most of what’s advised is command line based, you can port the information below to PC or Linux.
Importing a DVD
To import a DVD to a digital file for your archives, you can use makemkv: www.makemkv.com/. This makes a .mkv container file which holds all the streams (video, audio, subtitles etc.) of your DVD. Think of it as a disc image of the DVD, it runs just like the DVD with all menus and extra options. A full DVD extraction will probably be around 8gb. The main feature, probably 4-5gb.
This format isn’t that helpful for an analysis, expecially if we wish to inspect the audio, rather it would be really nice to see the audio in Reaper, to listen to the 5.1 or stereo files and perform audio analysis on them.
Coming up…
What follows may seem reasonably convoluted for a basic user of a computer, but it’s intended to open up a universe of possiblities that will become important to you in the future. Using FFMPEG and other commandline processing tools can even save you money and bring you into much closer contact with the engines behind many of the very expensive apps, DAWs and Video editors out there.
Install xcode
If you want to use xCode on other projects, install it , but be prepared to loose lots of HDD space and time downloading it. developer.apple.com/xcode/
If you install the commandline tools, this should be quicker, it’s explained in detail here:
railsapps.github.io/xcode-command-line-tools.html
I think you should be able to open the terminal and type:
xcode-select --install
When these are installed, you can do what follows. I realise that this is a non-trivial task, but if you’re interested in building apps for phones and are working with Unity etc. you’ll need xCode installed for iOS development anyway so, might as well bite the bullet now.
Install Homebrew
Open the terminal and paste this in:
ruby -e "$(curl -fsSL https://raw.githubusercontent.com/Homebrew/install/master/install)"
Above info from: trac.ffmpeg.org/wiki/CompilationGuide/MacOSX
More useful information about homebrew and how it works;
www.howtogeek.com/211541/homebrew-for-os-x-easily-installs-desktop-apps-and-terminal-utilities/
Installing FFMPEG
FFMPEG is a command line utility for converting media files. It’s powerful, fast and accurate.
In the terminal type
brew install ffmpeg
Installing Handbrake
In the terminal type
brew install handbrake
This will install handbrake and allow you to simply and quickly select chapters from the .mkv file you created from the DVD in the first place if you want to extract such.
Installing Makemkv command line
brew cask install makemkv
When you’ve got FFMPEG working and installed you can extract your film from the DVD, convert the file to something useful so you can do your analysis. I know, this is all a bit of a faff, but bear with it.
Install SoX while you’re at it
brew install sox
Extract some audio from your film for analysis
Your DVD/.mkv file will have various streams within its container, subtitles, the main film, dvd extras, and the sound for each of these extras or dubs will all be in differnt streams, so to find out which stream the audio you want is on, you first need to probe the .mkv for the right stream. So in the terminal, first navigate to the directory where your film is:
cd <path to the directory where your film is>
e.g
cd /Users/mparker/Movies/Hukkle
then
ffprobe movieName.mkv
you should get a nice pile of information printed to the terminal window.
see the kind of code you might getffprobe version 3.2.3 Copyright (c) 2007-2017 the FFmpeg developers built with Apple LLVM version 8.0.0 (clang-800.0.42.1) configuration: --prefix=/usr/local/Cellar/ffmpeg/3.2.3 --enable-shared --enable-pthreads --enable-gpl --enable-version3 --enable-hardcoded-tables --enable-avresample --cc=clang --host-cflags= --host-ldflags= --enable-libmp3lame --enable-libx264 --enable-libxvid --enable-opencl --disable-lzma --enable-vda libavutil 55. 34.101 / 55. 34.101 libavcodec 57. 64.101 / 57. 64.101 libavformat 57. 56.101 / 57. 56.101 libavdevice 57. 1.100 / 57. 1.100 libavfilter 6. 65.100 / 6. 65.100 libavresample 3. 1. 0 / 3. 1. 0 libswscale 4. 2.100 / 4. 2.100 libswresample 2. 3.100 / 2. 3.100 libpostproc 54. 1.100 / 54. 1.100 Input #0, matroska,webm, from 'hukkle.mkv': Metadata: encoder : libmakemkv v1.10.4 (1.3.3/1.4.4) darwin(x86-release) creation_time : 2017-02-08T14:11:13.000000Z Duration: 01:14:17.04, start: 0.000000, bitrate: 6691 kb/s Chapter #0:0: start 0.000000, end 317.720000 Metadata: title : Chapter 01 Chapter #0:1: start 317.720000, end 641.160000 Metadata: title : Chapter 02 Chapter #0:2: start 641.160000, end 1080.640000 Metadata: title : Chapter 03 Chapter #0:3: start 1080.640000, end 1441.800000 Metadata: title : Chapter 04 Chapter #0:4: start 1441.800000, end 1757.240000 Metadata: title : Chapter 05 Chapter #0:5: start 1757.240000, end 1903.840000 Metadata: title : Chapter 06 Chapter #0:6: start 1903.840000, end 2171.480000 Metadata: title : Chapter 07 Chapter #0:7: start 2171.480000, end 2388.000000 Metadata: title : Chapter 08 Chapter #0:8: start 2388.000000, end 2758.440000 Metadata: title : Chapter 09 Chapter #0:9: start 2758.440000, end 3593.520000 Metadata: title : Chapter 10 Chapter #0:10: start 3593.520000, end 3971.800000 Metadata: title : Chapter 11 Chapter #0:11: start 3971.800000, end 4457.040000 Metadata: title : Chapter 12 Stream #0:0(eng): Video: mpeg2video (Main), yuv420p(tv, top first), 720x576 [SAR 64:45 DAR 16:9], 25 fps, 25 tbr, 1k tbn, 50 tbc Metadata: BPS-eng : 6493847 DURATION-eng : 01:14:17.040000000 NUMBER_OF_FRAMES-eng: 111426 NUMBER_OF_BYTES-eng: 3617917132 SOURCE_ID-eng : 0100E0 _STATISTICS_WRITING_APP-eng: MakeMKV v1.10.4 darwin(x86-release) _STATISTICS_WRITING_DATE_UTC-eng: 2017-02-08 14:11:13 _STATISTICS_TAGS-eng: BPS DURATION NUMBER_OF_FRAMES NUMBER_OF_BYTES SOURCE_ID Stream #0:1(eng): Audio: ac3, 48000 Hz, stereo, fltp, 192 kb/s (default) Metadata: title : Stereo BPS-eng : 192000 DURATION-eng : 01:14:17.024000000 NUMBER_OF_FRAMES-eng: 139282 NUMBER_OF_BYTES-eng: 106968576 SOURCE_ID-eng : 0180BD _STATISTICS_WRITING_APP-eng: MakeMKV v1.10.4 darwin(x86-release) _STATISTICS_WRITING_DATE_UTC-eng: 2017-02-08 14:11:13 _STATISTICS_TAGS-eng: BPS DURATION NUMBER_OF_FRAMES NUMBER_OF_BYTES SOURCE_ID Stream #0:2(eng): Subtitle: dvd_subtitle, 720x576 (default) Metadata: BPS-eng : 119 DURATION-eng : 01:13:31.555200000 NUMBER_OF_FRAMES-eng: 21 NUMBER_OF_BYTES-eng: 65804 SOURCE_ID-eng : 0120BD _STATISTICS_WRITING_APP-eng: MakeMKV v1.10.4 darwin(x86-release) _STATISTICS_WRITING_DATE_UTC-eng: 2017-02-08 14:11:13 _STATISTICS_TAGS-eng: BPS DURATION NUMBER_OF_FRAMES NUMBER_OF_BYTES SOURCE_ID
You are probably interested in stream #0:1 which is most likely to have the .ac3 audio file in either stereo or 5.1. To extract that to PCM audio with the channel ordering in ITU FILM format (L,R,C,sub,Ls,Rs).
This will extract the audio of stream #0:1 to a 16bit pcm wav file in 2 channels (I think FFMPEG actually makes a down mix (removing the LFE channel)) if this is a 5.1 .ac3 file:
ffmpeg -i video.mkv -map 0:1 -acodec pcm_s16le -ac 2 audio.wav
For more channel munging FFMPEG skills read this: trac.ffmpeg.org/wiki/AudioChannelManipulation
You’ll see in the command line above, we call the FFMPEG software, specify the input, map the stream you want to the audio codec (acodec) pcam_s16e with 2 audio channels [-ac 2] to filename audio.wav
If you want to extract the 5.1 without downmixing (reccommended)
ffmpeg -i video.mkv -map 0:1 -acodec pcm_s16le -ac 6 audio.wav
The only thing we’ve changed is the number of audio channels. What would you change if you wanted to get a 24bit audio file?
PCM channel ordering
What if the channel ordering is messed up? You can hardwire the channel ordering like this:
ffmpeg -i video.mkv -map 0:1 -acodec pcm_s24le -ac 6 -af pan="5.1(side):c0=FL|c1=FR|c2=FC|c3=LFE|c4=SL|c5=SR" audio.wav
Extracting stems
If you want to extract the stems to individual files from the audio track you get above, try this;
ffmpeg -i yourAudioFile.wav -filter_complex "channelsplit=channel_layout=5.1[FL][FR][FC][LFE][BL][BR]" -map "[FL]" front_left.wav -map "[FR]" front_right.wav -map "[FC]" front_center.wav -map "[LFE]" lfe.wav -map "[BL]" back_left.wav -map "[BR]" back_right.wav
Using FFMPEG to extract a segment of your input file and export to something useful for your analysis:
Of course, you don’t really want to do this with a whole DVD and you may want to import the film with PCM audio into Reaper. So, decide which bit of the film you want to analyse. Get the start point in hours, minutes, seconds and find the duration and specify this -t. Specify the video codec for output, container format -f mov output movie name.
ffmpeg -i input.mkv -ss 00:01:45 -t 00:02:00 -vcodec h264 -acodec pcm_s24le -ac 6 -af pan="5.1(side):c0=FL|c1=FR|c2=FC|c3=LFE|c4=SL|c5=SR" -f mov output.mov
e.g.
ffmpeg -i bbss.mkv -ss 00:01:45 -t 00:00:30 -vcodec h264 -acodec pcm_s24le -ac 6 -af pan="5.1(side):c0=FL|c1=FR|c2=FC|c3=LFE|c4=SL|c5=SR" -f mov mySelection.mov
To get just the audio of your extract, perhaps as a downmixed stereo file to make some forms of analysis slightly simpler, you could try this
ffmpeg -i movieSource.mkv -ss 00:01:45 -t 00:00:30 -map 0:1 -acodec pcm_s24le -ac 2 stereoAudioDownMixOfSelection.wav
for a 5.1 version of the same
ffmpeg -i movieSource.mkv -ss 00:01:45 -t 00:00:30 -map 0:1 -acodec pcm_s24le -ac 6 -af pan="5.1(side):c0=FL|c1=FR|c2=FC|c3=LFE|c4=SL|c5=SR" surroundVersionOfSelection.wav
UPDATE
I have found that if you extract your video as .mov with hard wired 5.1 as above, Reaper doesn’t seem to like to import it nicely, even though it plays fine in media players. So run this on your extract and then import to Reaper and it seems to work
ffmpeg -i yourExtract.mov -vcodec copy -acodec pcm_s24le -ac 6 -af pan="5.1:c0=FL|c1=FR|c2=FC|c3=LFE|c4=SL|c5=SR" -f mov yourExtractToReaper.mov
Analysis of your audio
Check out SoX and install it on your machine (see above);
Look at the file formats that SoX can cope with;
sox.sourceforge.net/soxformat.html
Handy tutorial on generating spectrograms from SoX
jdesbonnet.blogspot.co.uk/2013/08/using-sox-spectrogram-tool-to-analyze.html
Try this in the command line
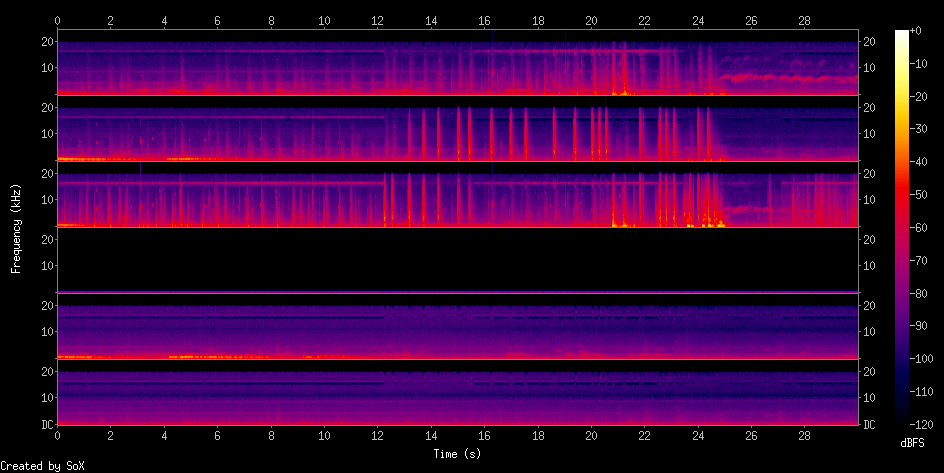
sox surroundVersionOfSelection.wav -n spectrogram -o spectrum.png
It might give you something like this, a spectrogram of each channel.
How about generating a spectrogram of Channel 3?
Extract the centre channel
sox surroundVersionOfSelection.wav centre.wav remix 3
Generate your spectrogram
sox centre.wav -n spectrogram -o centreSpectrogram.png

Want more detail from the key areas of the voice or extract? Try resampling. The command below will take your source audio, select 40 seconds starting at 20 seconds, resample the 48k to 6k, giving you a focus on the first 3k of the spectrum, it will do this to channel 3 and produce you a spectrogram of that 40 second clip:
sox audio.wav -n trim 20 40 rate 6k remix 3 spectrogram -o centreSpectrogram.png
You could explore some useful ways of exporting an image for every keyframe that you select in Reaper by exporting your markers as a csv or text file and using these indices to generate a still from the film and a spectrogram.
Here’s a way to extract a segment of audio that you want to concentrate on. It should take your surround audio file, generate a new file called Klangers.wav, trim 10 seconds at second 33 and give you only the centre channel. This is useful because it gives you the sound file of the same extract you’ve visualised.
sox audio.wav klangers.wav trim 33 10 remix 3 -n rate 5k spectrogram -o klangers.png

Extra/off-topic – using ‘for’ to do batch conversion
batch convert from flac to alac (apple lossless) and add image file, navigate to your folder of flacs and punch this in
for f in *.flac; do ffmpeg -i "$f" -c:a alac "${f/%flac/m4a}"; done
batch add artwork with mp4 art. This is part of the mp4v2 package which you simply install with
brew install mp4v2
Then try this, which looks for all the m4a (apple lossless files in the direcotry, then adds the .jpg file in the same directory.
for f in *.m4a; do mp4art --add *.jpg "$f"; done
to join them both if conversion to ALAC was successful, use &&
for f in *.flac; do ffmpeg -i "$f" -c:a alac "${f/%flac/m4a}"; done && for f in *.m4a; do mp4art --add *.jpg "$f"; done
Links
Some useful links and starter tips for command-line processing
SoX
www.thegeekstuff.com/2009/05/sound-exchange-sox-15-examples-to-manipulate-audio-files/
FFMPEG
ffmpeg.org/
FFMPEG Audio RESAMPLER: ffmpeg.org/ffmpeg-resampler.html
Commands for all needs;
www.catswhocode.com/blog/19-ffmpeg-commands-for-all-needs
Batch Scripting, yeah!
www.gna-productions.com/tutos/video/how-to-use-ffmpeg-with-batch-scripts
Helpful indeed:
gist.github.com/protrolium/e0dbd4bb0f1a396fcb55
Useful too:
superuser.com/questions/538112/meaningful-thumbnails-for-a-video-using-ffmpeg